
HOME GROWN.
DABBLING IN HYDROPONICS
FARM DESIGN & PLANNING
Where gets the best light? Where do I have space? What are the safety hazards? What do I want to grow?
These were the some of the questions I asked myself starting out my design. Starting with the grow area, I decided to make space in my living room since it gets the most natural light and I could make use of vertical space to build a wall-mounted nutrient film technique (NFT) system. Since I wanted to grow a wide variety of herbs and leafy greens, the NFT system seemed the most efficient way to accomplish this. With my NFT system mounted, that meant I would have space on the floor to place two 5-gallon Deep Water Culture (DWC) buckets. These would be reserved for the two plants that would need the most support: tomatoes and broccoli. Now, me and my partner eat a loooot of kale, so I was going to use a large plastic tote designed as a flood and drain (F&D) system and dedicate it solely to kale. This is what my first farm plan design looked like:
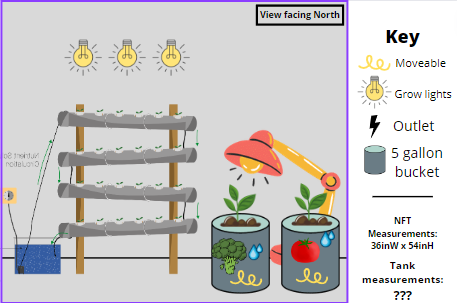

Once I started to dive deeper into how these systems worked, how I would meet the needs of my crops, and how I was going to make this all work with a $500 budget, I realized I was a bit in over my head. I decided to ditch the F&D and put all of my focus into my NFT/DWC Combo. With that set, I was able to begin researching design and material options. Being ambitious, I was dead set on making my NFT system myself with these DIY instructions...until I started trying to order PVC pipes. Luckily I found a wall-mounted NFT kit that wouldn't break the bank and I kept it pushing. Lighting gave me grief though. Tomatoes need a lot of light, and with my NFT system vertical I needed to make sure they would get enough light. Take a look at my set up to see how it all turned out.